Last verified: September 6, 2026.
This guide is written for beginners who want a working AI-assisted coding environment. Follow the parts in order: install and understand VS Code first, install Claude Code and connect it with the DeepSeek API second, then install Python. Once Claude Code is working, you can ask it to explain Python installation errors as they appear.
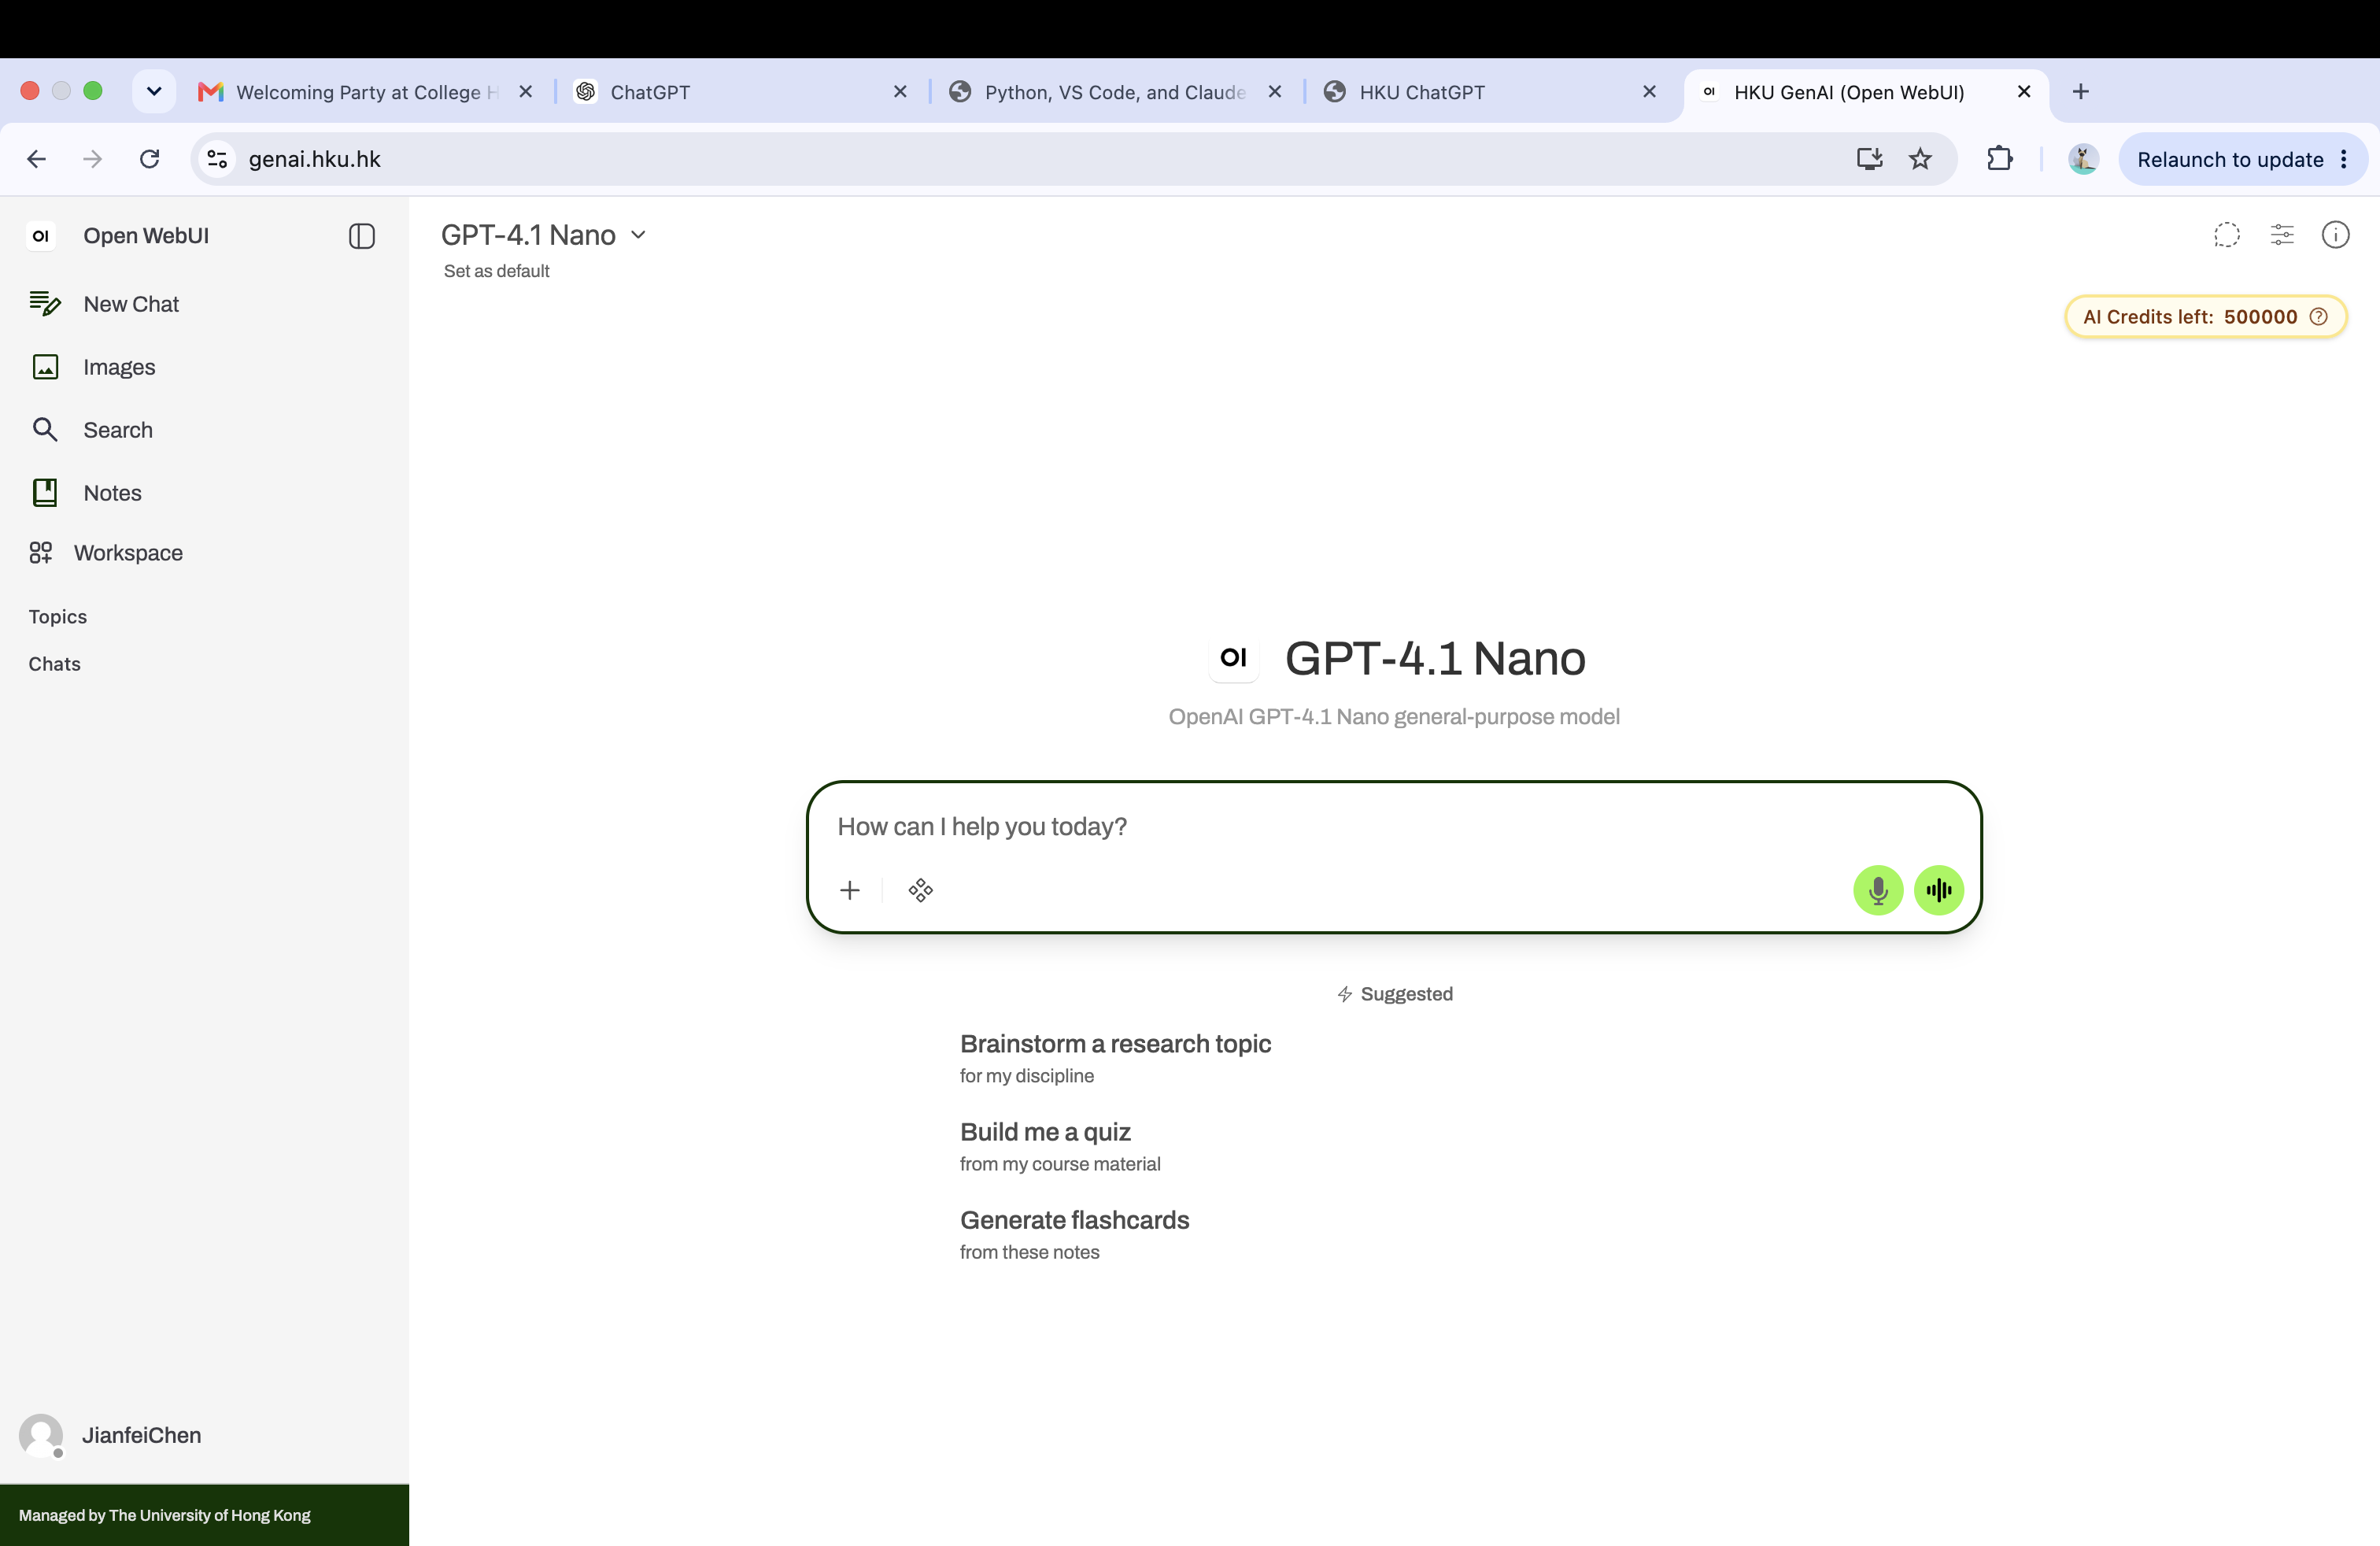
Before You Begin: Get Help from HKU GenAI App
Computer settings vary by operating system, version, user permissions, network environment, and previously installed software. Because of these differences, you may encounter error messages or installation problems that do not look exactly like the examples in this guide.
Open HKU GenAI App: https://genai.hku.hk
Sign in with your HKU Portal account. If you encounter a difficult problem during installation, ask HKU GenAI App for help. Include the step you are working on, your operating system, the exact command you entered, and the complete error message. A screenshot of the problem can also help it provide more specific instructions.
Important: Do not share passwords, API keys, access tokens, or other private information in your question. Remove or cover sensitive information before uploading a screenshot.
Part 1: Installing and Introducing VS Code
Install VS Code, learn the main interface areas, and understand the menus commonly used by Python beginners.
VS Code is the editor where you write, organize, run, and debug code. It becomes especially useful after installing extensions such as Python and Jupyter.
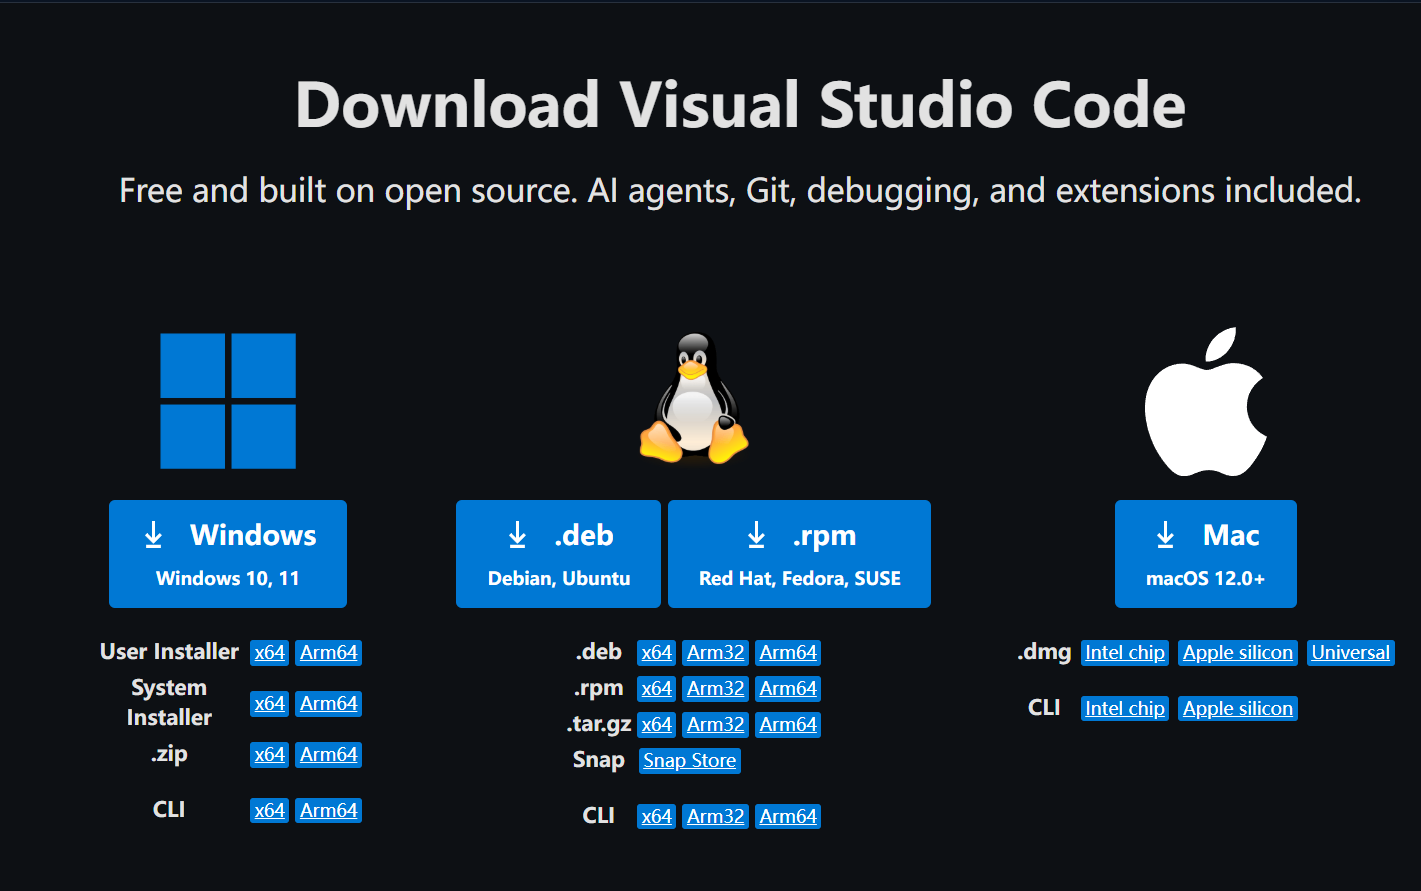
Step 1: Download VS Code
Go to the official VS Code download page:
https://code.visualstudio.com/download
Choose the installer that matches your operating system.
Use the stable version unless you specifically need an insider or preview build. The stable version is recommended for everyday coding and teaching.
Step 2: First Look at VS Code
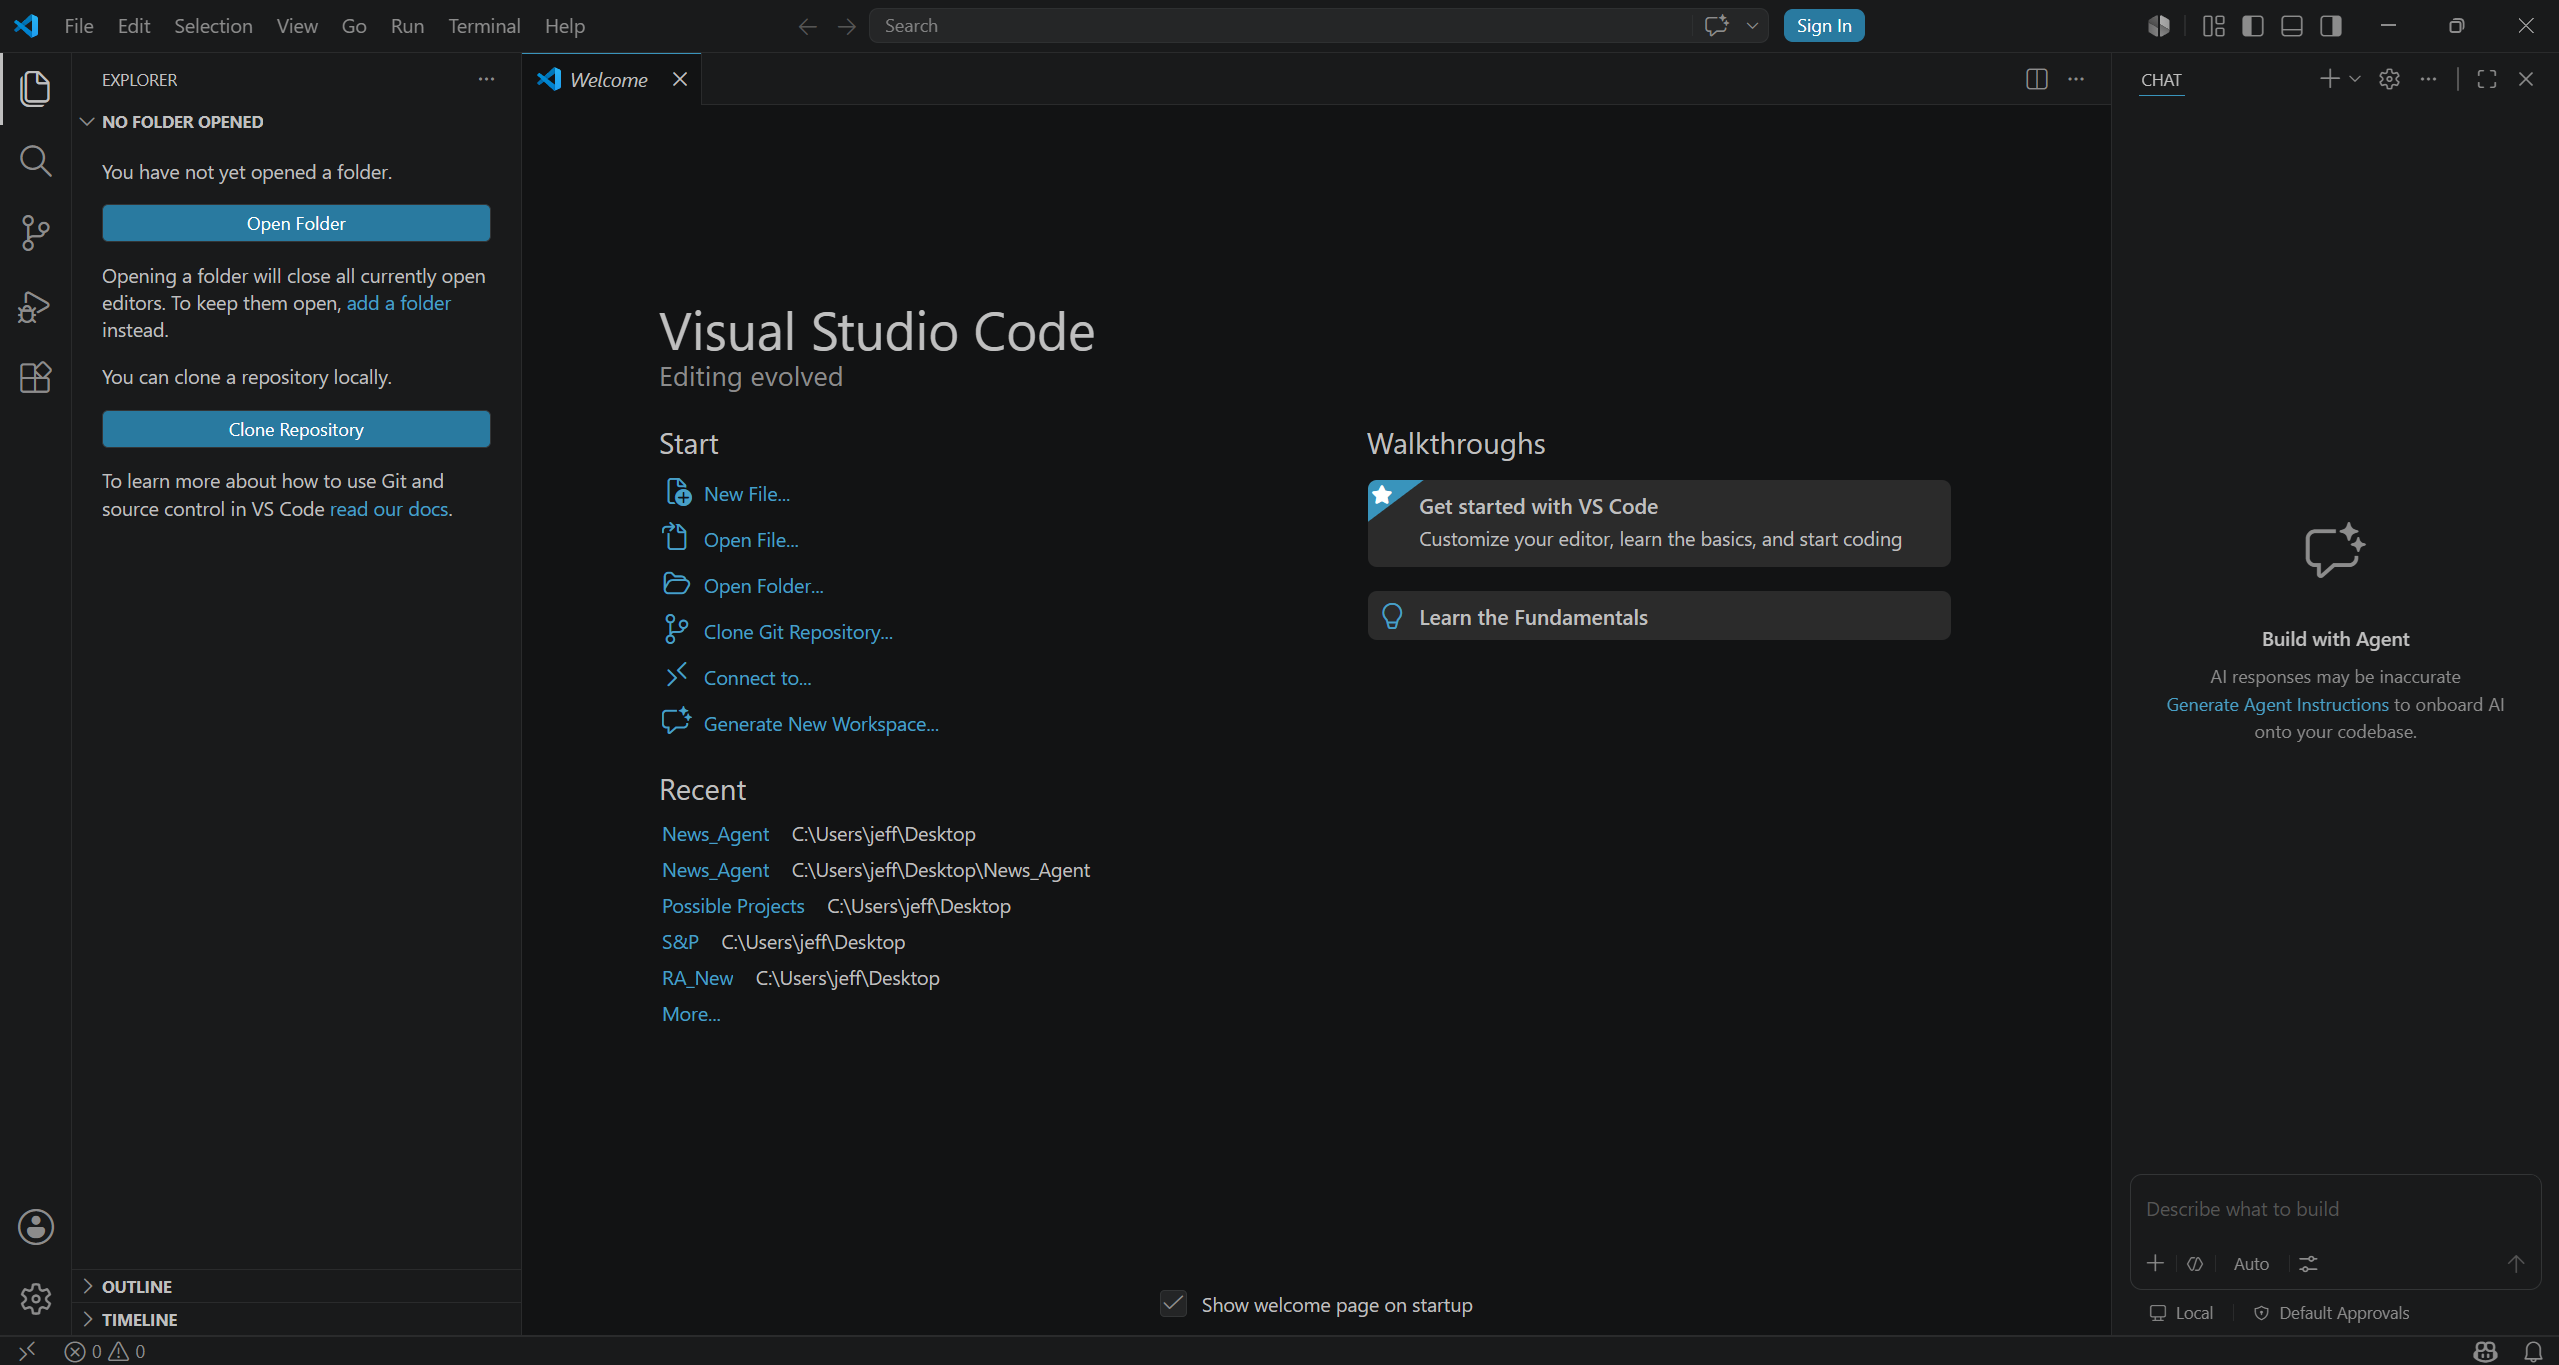
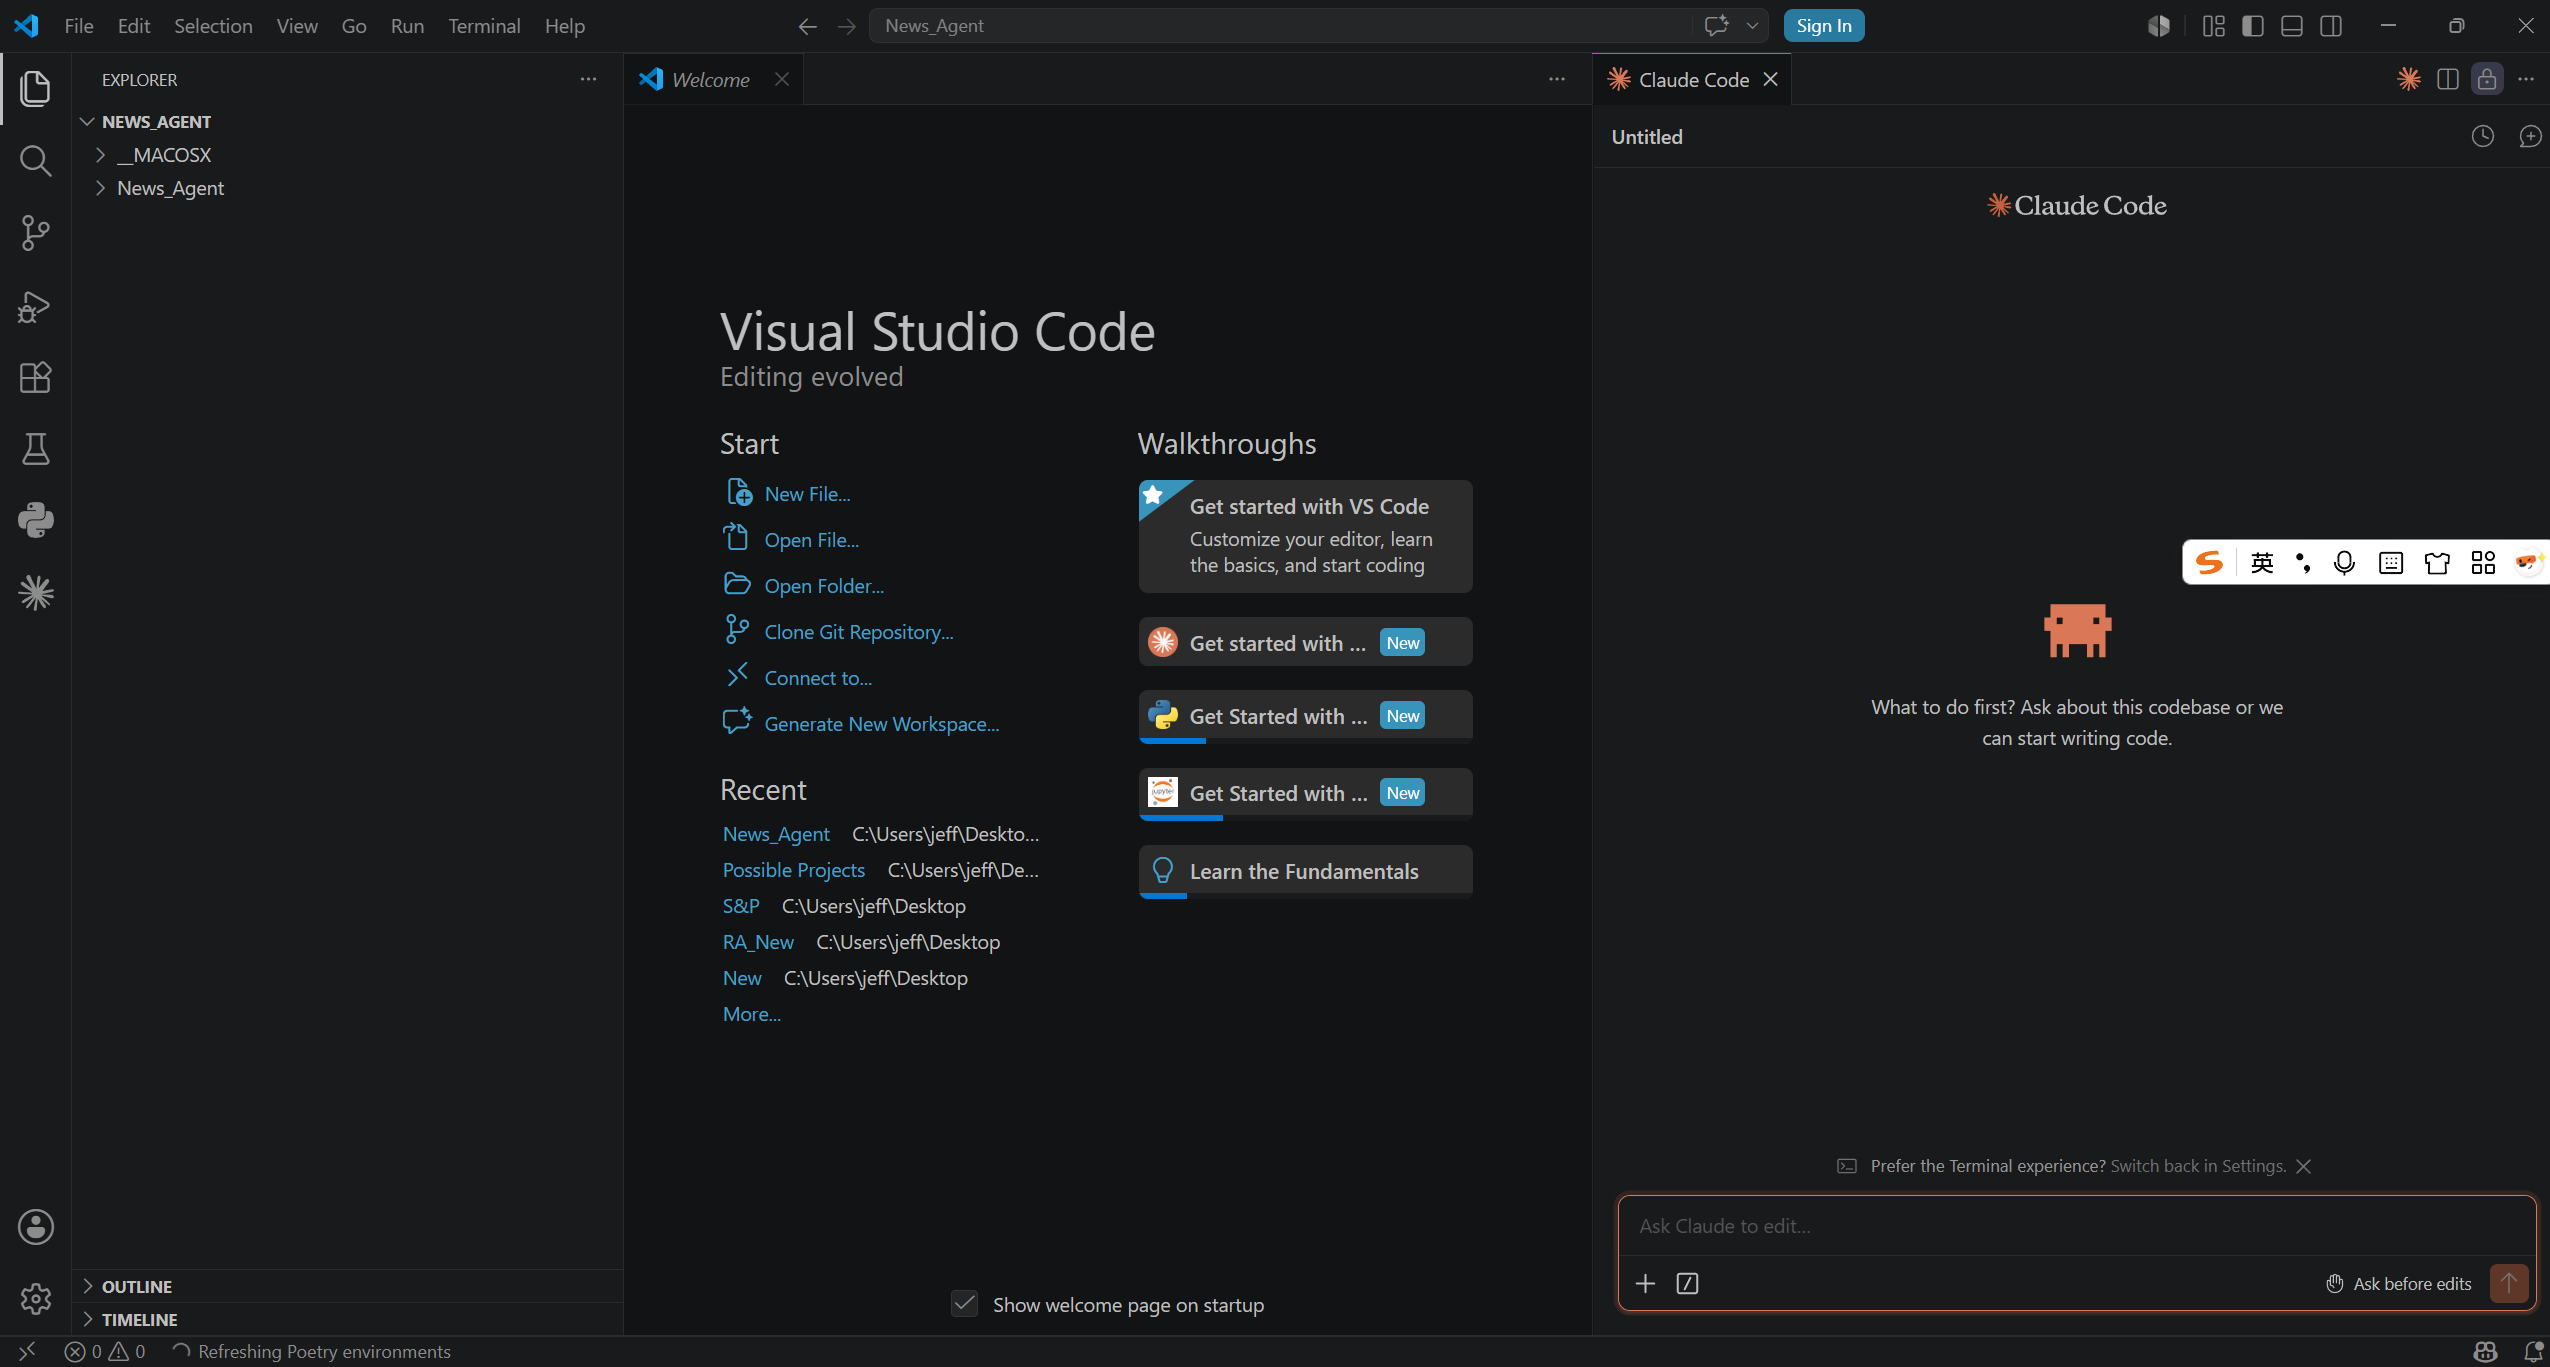
If this is your first time opening VS Code, the interface may look similar to the screenshot below.
The most important areas are the left Activity Bar, the Explorer sidebar, the editor area, and the integrated terminal. You do not need to understand every button at the beginning.
Step 3: Understand the Main Interface Areas
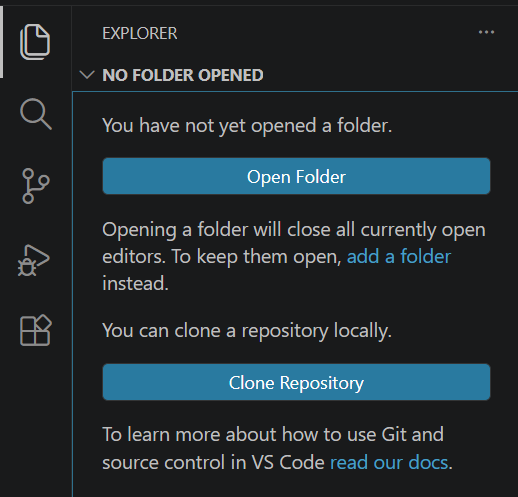
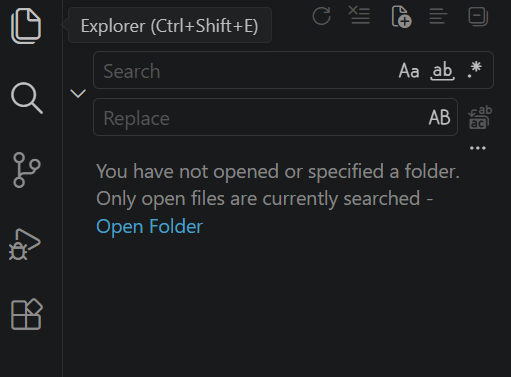
Explorer
Most of the time, VS Code is used for one project at a time. Open the project folder in VS Code, then edit the files from the Explorer.
The Explorer shows all files and folders in your project. A good habit is to create one folder for each project, then open that folder with File -> Open Folder.
Search
When a project has many files, Search helps you quickly find code, text, or filenames.
Search is useful when you remember a function name, variable name, error message, or keyword but do not remember which file contains it.
Extensions
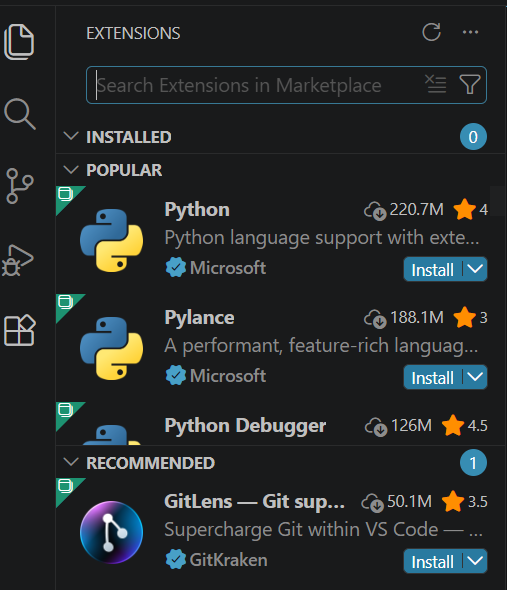
VS Code supports many extensions, such as Python, Jupyter, and Claude Code for VS Code. Extensions connect VS Code with powerful development tools.
After installing a new extension, reopen VS Code if the extension asks you to reload.
Recommended extensions for Python beginners:
- Python: provides Python language support, running, debugging, and environment selection.
- Jupyter: allows you to work with Python notebooks.
- Claude Code for VS Code: allows you to use Claude Code inside VS Code.
Step 4: Useful VS Code Menus for Python Beginners

| Menu | Main Function | Useful Tip for Python Beginners |
|---|---|---|
| File | Manages files, folders, and windows. | To start a Python project, choose File -> Open Folder, then select your project folder. |
| Edit | Helps you edit text in the editor. | Common shortcuts include Ctrl + Z for undo, Ctrl + C for copy, Ctrl + V for paste, and Ctrl + F for find. |
| Selection | Controls text selection and cursor behavior. | This is not used often at the beginning, but it becomes useful when editing many lines at once. |
| View | Controls what parts of the VS Code interface are displayed. | If you cannot find the terminal, choose View -> Terminal. |
| Go | Helps you quickly jump to different places in your project. | This is useful when your project becomes larger and has many files. |
| Run | Runs and debugs your program. | Use this menu to run a Python file or debug your code step by step. |
| Terminal | Opens the command line inside VS Code. | On macOS/Linux, use python3 --version or python3 test.py. On Windows, use py --version or py test.py. |
| Help | Provides help and information about VS Code. | Use this menu when you need official help or want to check your VS Code version. |
Part 2: Installing Claude Code with DeepSeek API in VS Code
Install Claude Code, connect it with VS Code, and configure the DeepSeek API through CC Switch.
Claude Code is a coding assistant that can help you understand code, edit files, run commands, and work inside a project. In this guide, Claude Code is configured to use the DeepSeek API through CC Switch.
Prerequisites
- VS Code
- A DeepSeek API Key
- A Terminal or command prompt
- Homebrew on macOS, or WinGet on Windows
- A network environment that can access the selected package manager
Installation note: Anthropic recommends its native installer. This guide uses Anthropic's official Homebrew and WinGet alternatives, which do not require Node.js or npm. The DeepSeek and CC Switch configuration later in this guide is not part of Anthropic's official account setup.
Step 1: Install the VS Code Extension
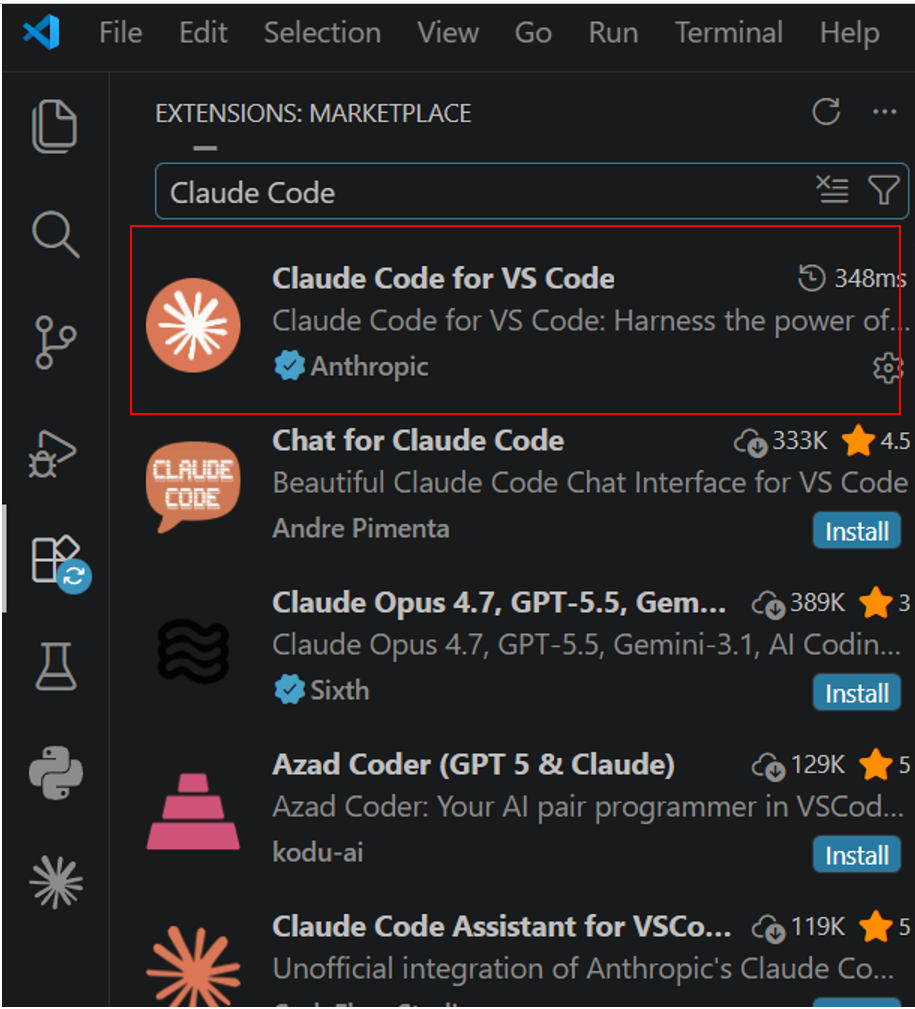
Open the Extensions panel in VS Code, then search for and install Claude Code for VS Code.
The VS Code extension provides the editor-side integration. The command-line Claude Code tool is installed separately in a later step.
Step 2: Install Claude Code
Use the package-manager command for your operating system. Do not add sudo to any command below.
macOS: Install with Homebrew
Homebrew is a tool for installing and updating software on macOS using Terminal. In this guide, we use it to install Claude Code.
First, check whether Homebrew is installed:
brew --versionIf the command is not found, install Homebrew by following the instructions at https://brew.sh, then reopen Terminal.
Homebrew provides two Claude Code release channels. Choose one of them:
| Channel | Installation Command | When to Choose It |
|---|---|---|
| Stable | brew install --cask claude-code | Recommended for most students. It is usually about one week behind and skips releases with major regressions. |
| Latest | brew install --cask claude-code@latest | Use this if you need new releases as soon as they are published. |
For the stable channel, run:
brew install --cask claude-codeFor the latest channel, run instead:
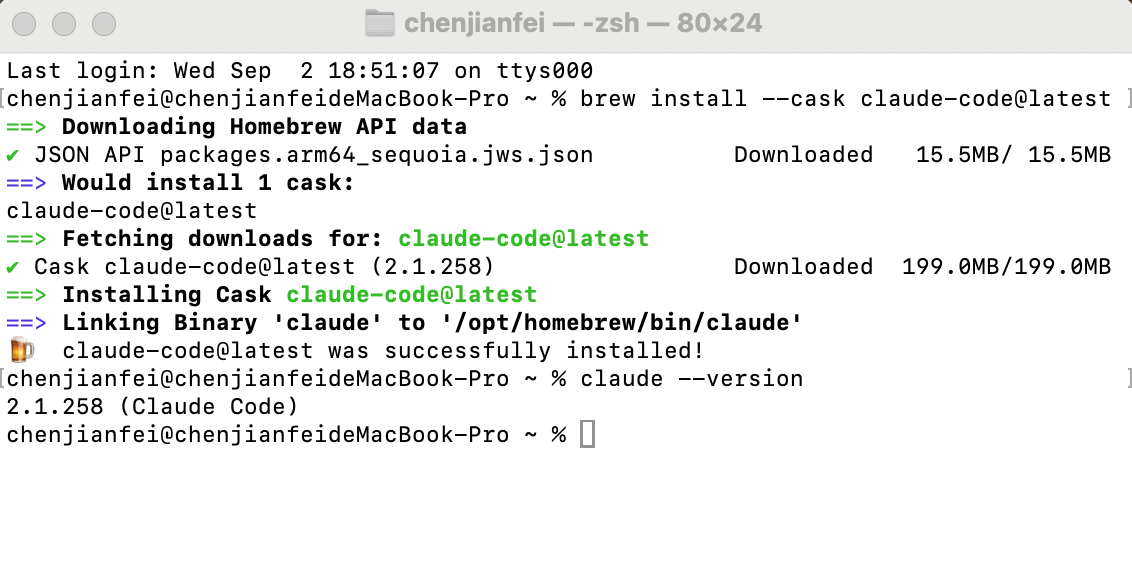
brew install --cask claude-code@latestAfter running the installation command, enter claude --version. A successful macOS installation should show output similar to the following screenshot. The exact version number may be different.
Do not install both channels. Homebrew installations do not update automatically by default, so update Claude Code yourself periodically with the command matching the channel you installed:
# Stable channel
brew upgrade claude-code

# Latest channel
brew upgrade claude-code@latest
Windows: Install with WinGet
Open PowerShell or Command Prompt and run:
winget install Anthropic.ClaudeCodeAfter the installation finishes, restart PowerShell or Command Prompt if requested, then enter claude --version. A successful Windows installation should show output similar to the following screenshot. The exact version number may be different.
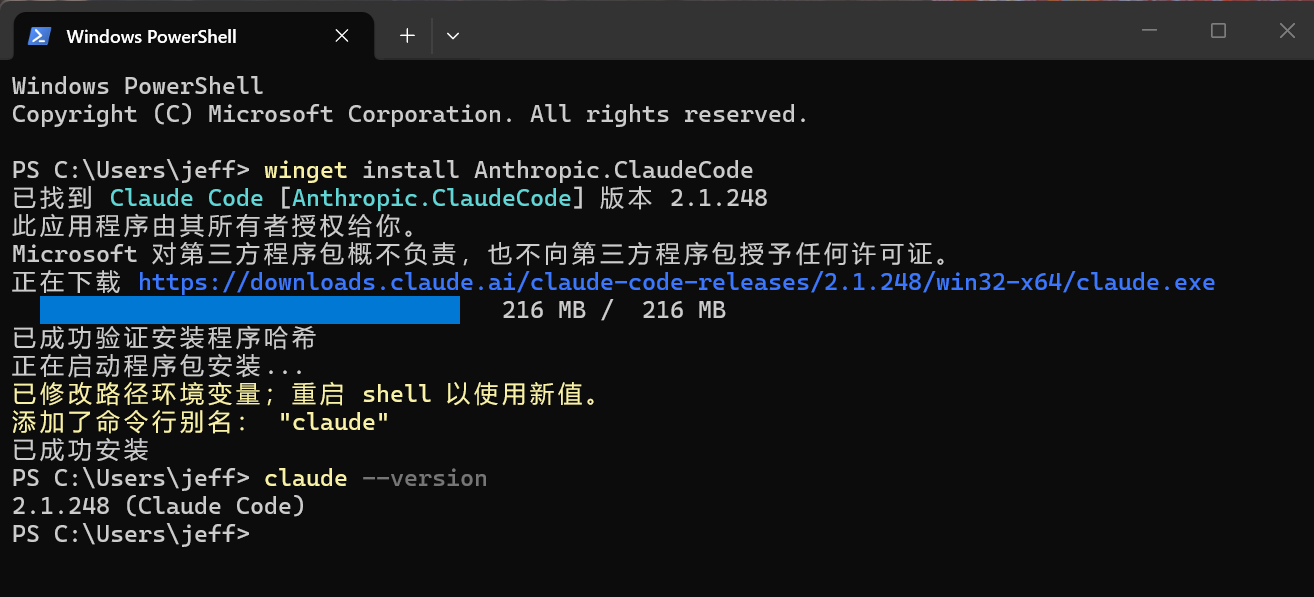
If winget is not found, install or update App Installer from the Microsoft Store, then reopen the terminal.
WinGet installations also do not update automatically by default. Check for and install Claude Code updates periodically:
winget upgrade Anthropic.ClaudeCodeUnlike Homebrew on macOS, the WinGet instructions do not provide separate stable and latest package names.
Step 3: Verify the Installation
Close and reopen Terminal if necessary, then run:
claude --versionIf the command prints a version number followed by (Claude Code), the installation succeeded. If claude is not found, restart Terminal and try again.
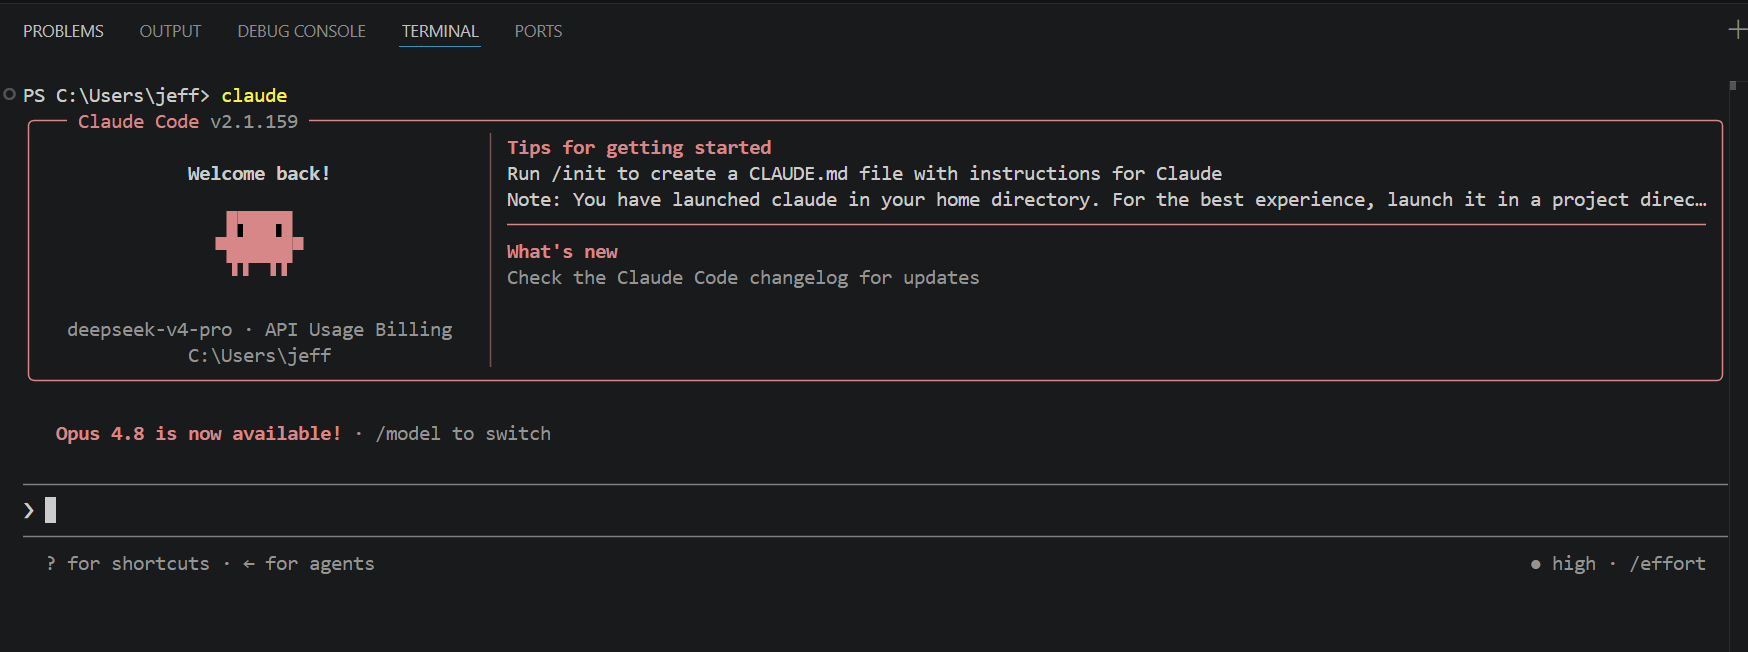
After completing the CC Switch configuration in the next step, open your project folder in VS Code, open its integrated Terminal, and run:
claudeIf you see an interface similar to the screenshot below, Claude Code is ready to use.
Step 4: Install CC Switch and Configure the DeepSeek API
CC Switch is used to switch Claude Code to the DeepSeek API.
Without this configuration, Claude Code may try to use its default API connection. CC Switch helps route Claude Code requests through the DeepSeek API instead.
Project URL:
https://github.com/farion1231/cc-switch
Open the project's Releases page, expand Assets, and download the installer that matches your operating system.
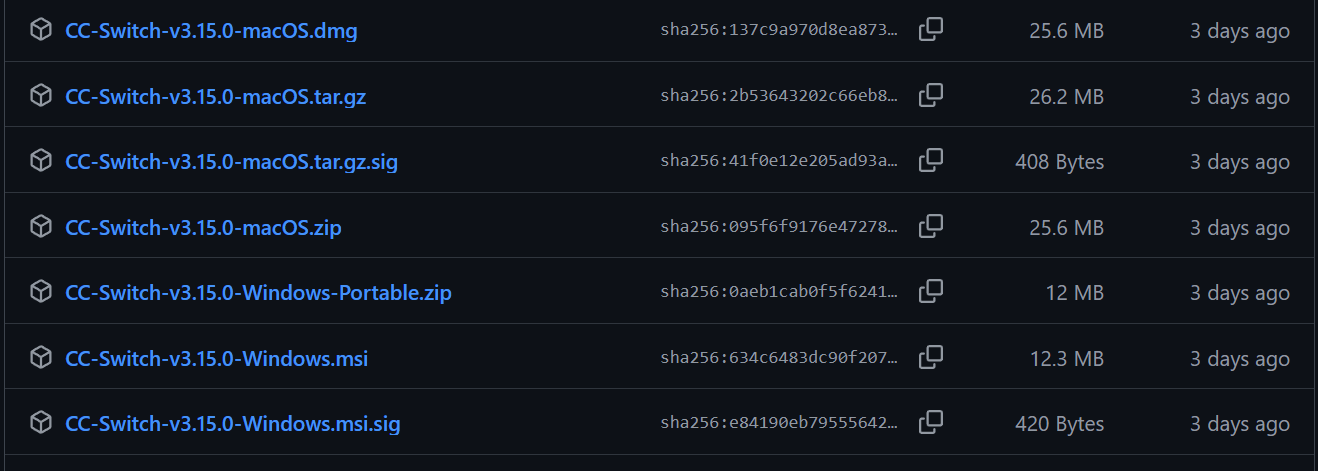
Installer options:
| Operating System | Installer |
|---|---|
| macOS | Choose the file ending in .dmg |
| Windows | Choose the file ending in .msi |
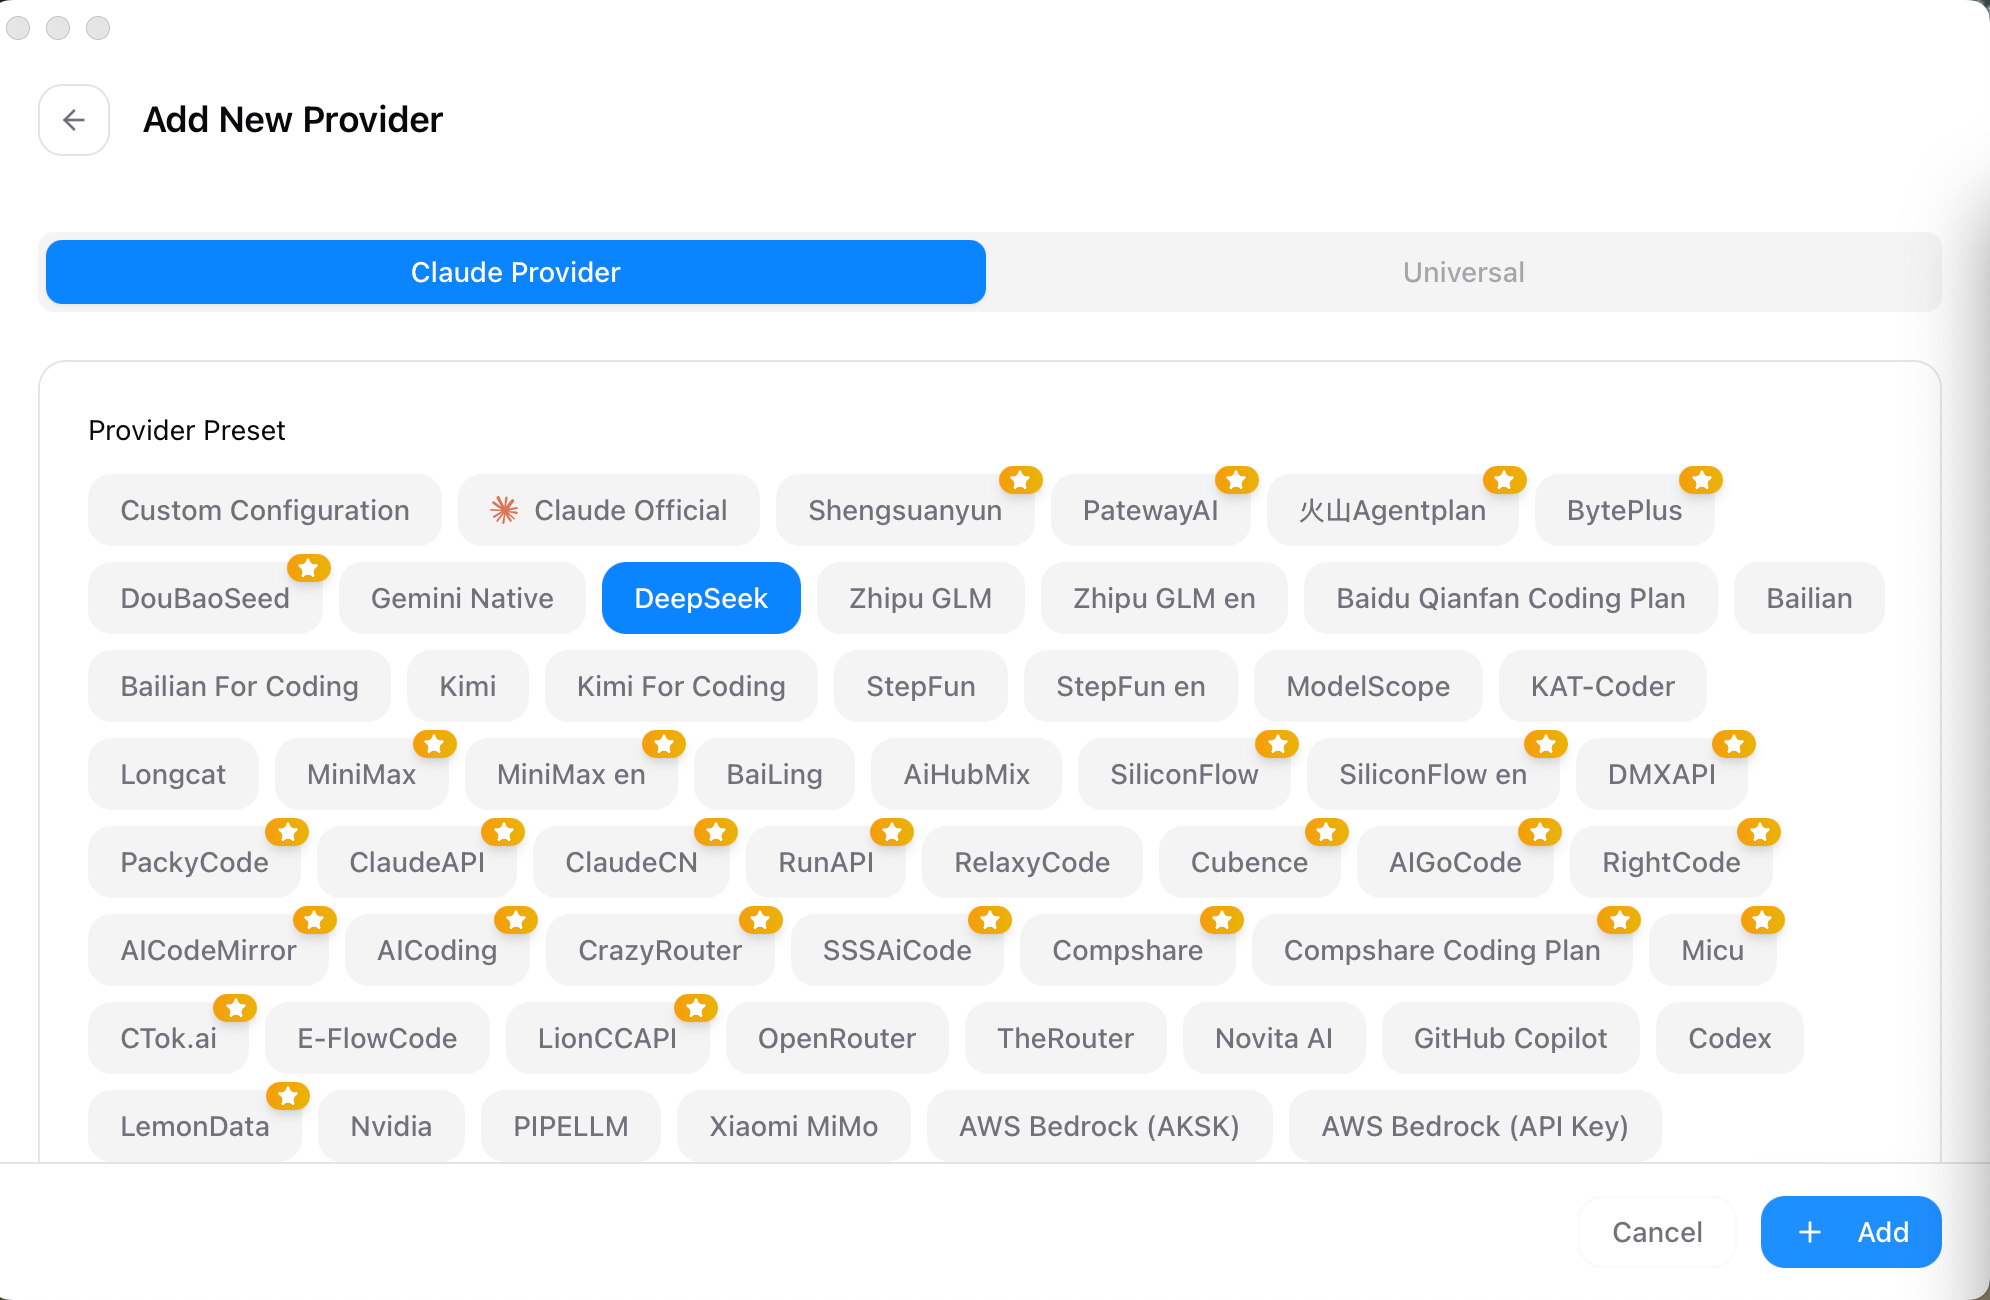
After opening CC Switch:
Recommended provider: We recommend using DeepSeek for this course, and the steps below use DeepSeek as the example. However, CC Switch also supports other model providers, such as Kimi. You may choose another provider if you prefer; select its preset and enter the API Key issued by that provider. The configuration fields may vary slightly between providers.
For the recommended DeepSeek setup:
- Select DeepSeek.
- Enter your DeepSeek API Key.
- Save the configuration.
- Click Enable on the DeepSeek provider card. Saving alone does not activate it.
Make sure there are no extra spaces before or after the API key when you paste it.
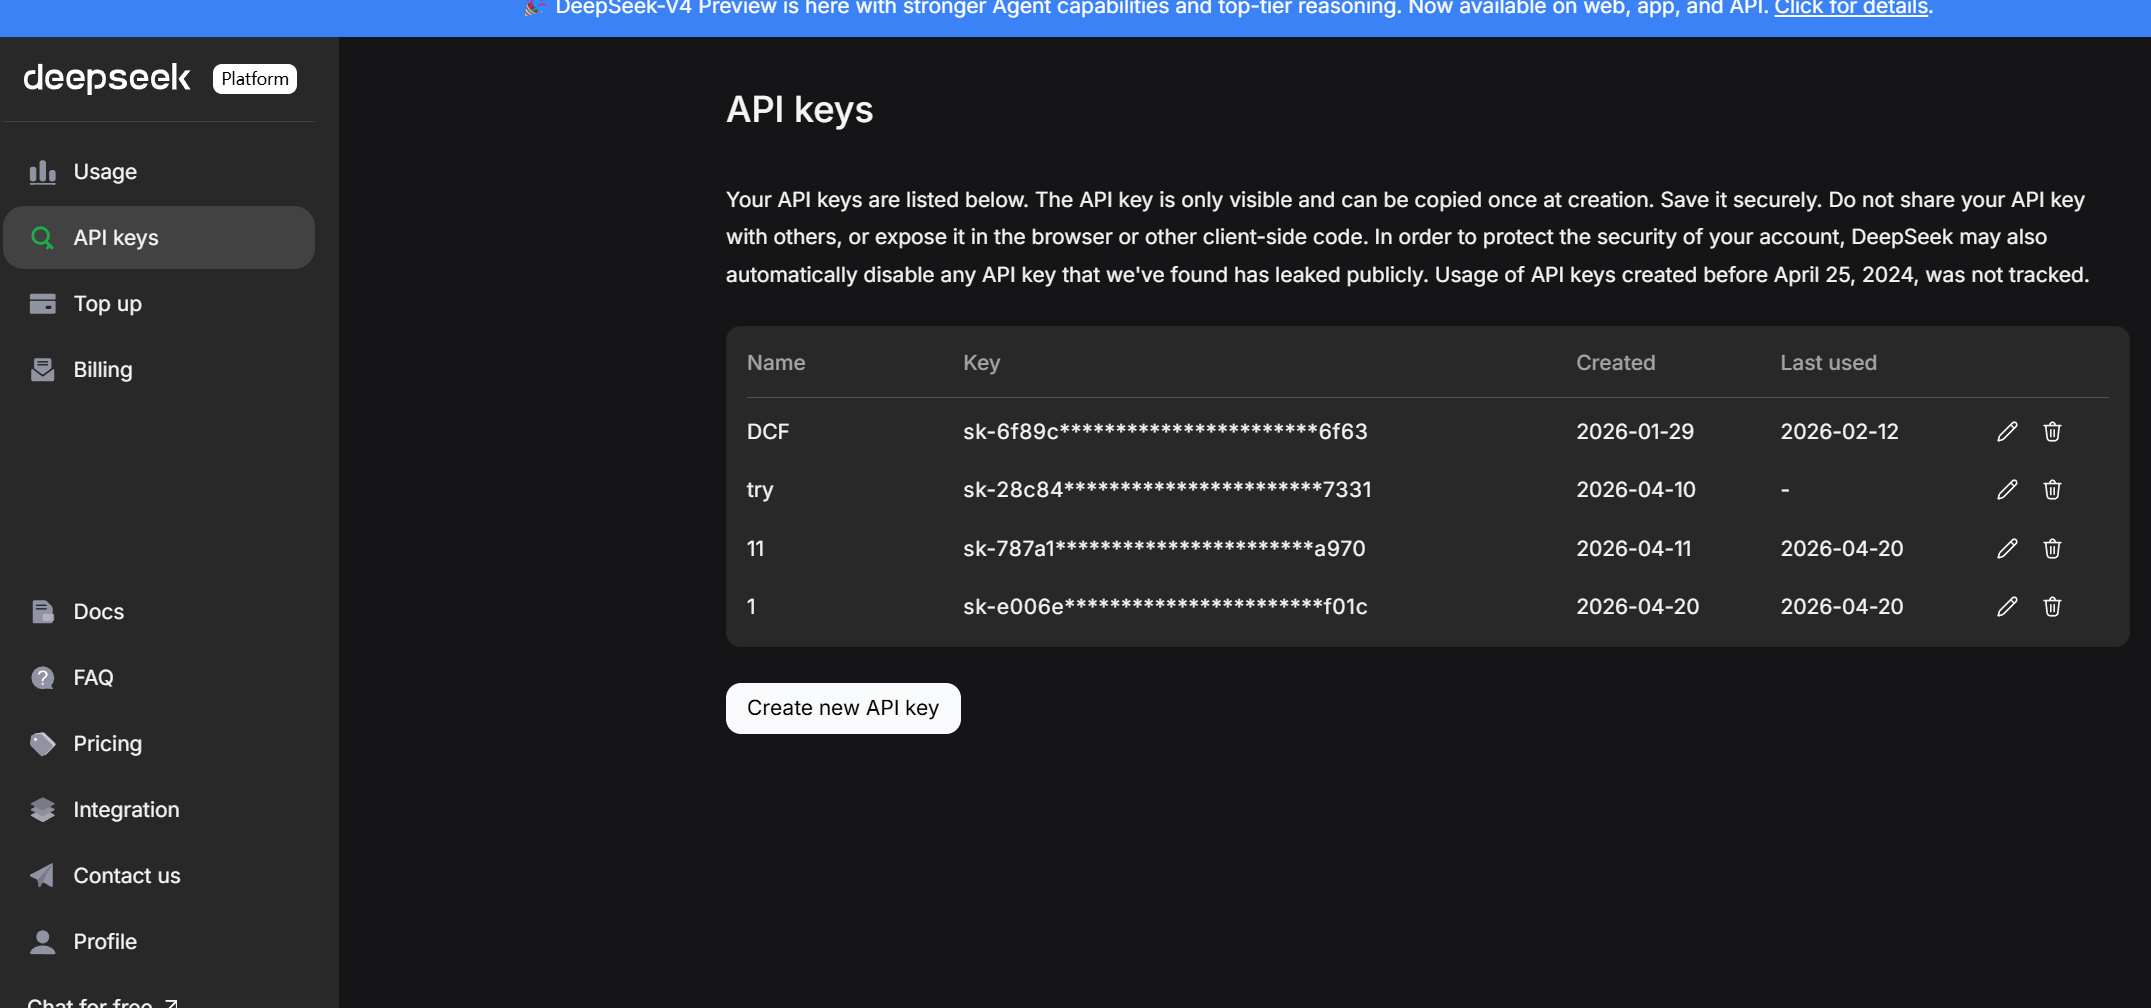
Create or manage your DeepSeek API Key here:
https://platform.deepseek.com/api_keys
Payment note: You need to create and fund your own DeepSeek account. The master program may provide API access later, but it is not available yet.
Note: A DeepSeek API Key is shown in full only once when it is created. Save it immediately after creating it.
Finish Setup
After completing the steps above, open your project folder in VS Code and run claude in the integrated Terminal. Enter a simple test request. Continue to Part 3 when Claude Code responds normally.
Part 3: Installing Python
Install Python from the official website, choose the right version, and make sure Python can be used from VS Code or Terminal.
Python is the programming language runtime. After installation, your computer will be able to run .py files and use Python package tools such as pip. If a command fails, remove any passwords or API keys from the error message, then ask Claude Code in VS Code to explain the error and suggest the next check.
Step 1: Open the Python Download Page
Go to the official Python download page:
https://www.python.org/downloads/
The official website is the safest place to download Python. Avoid downloading Python installers from random third-party websites, because they may be outdated or modified.
Step 2: Choose a Python Version
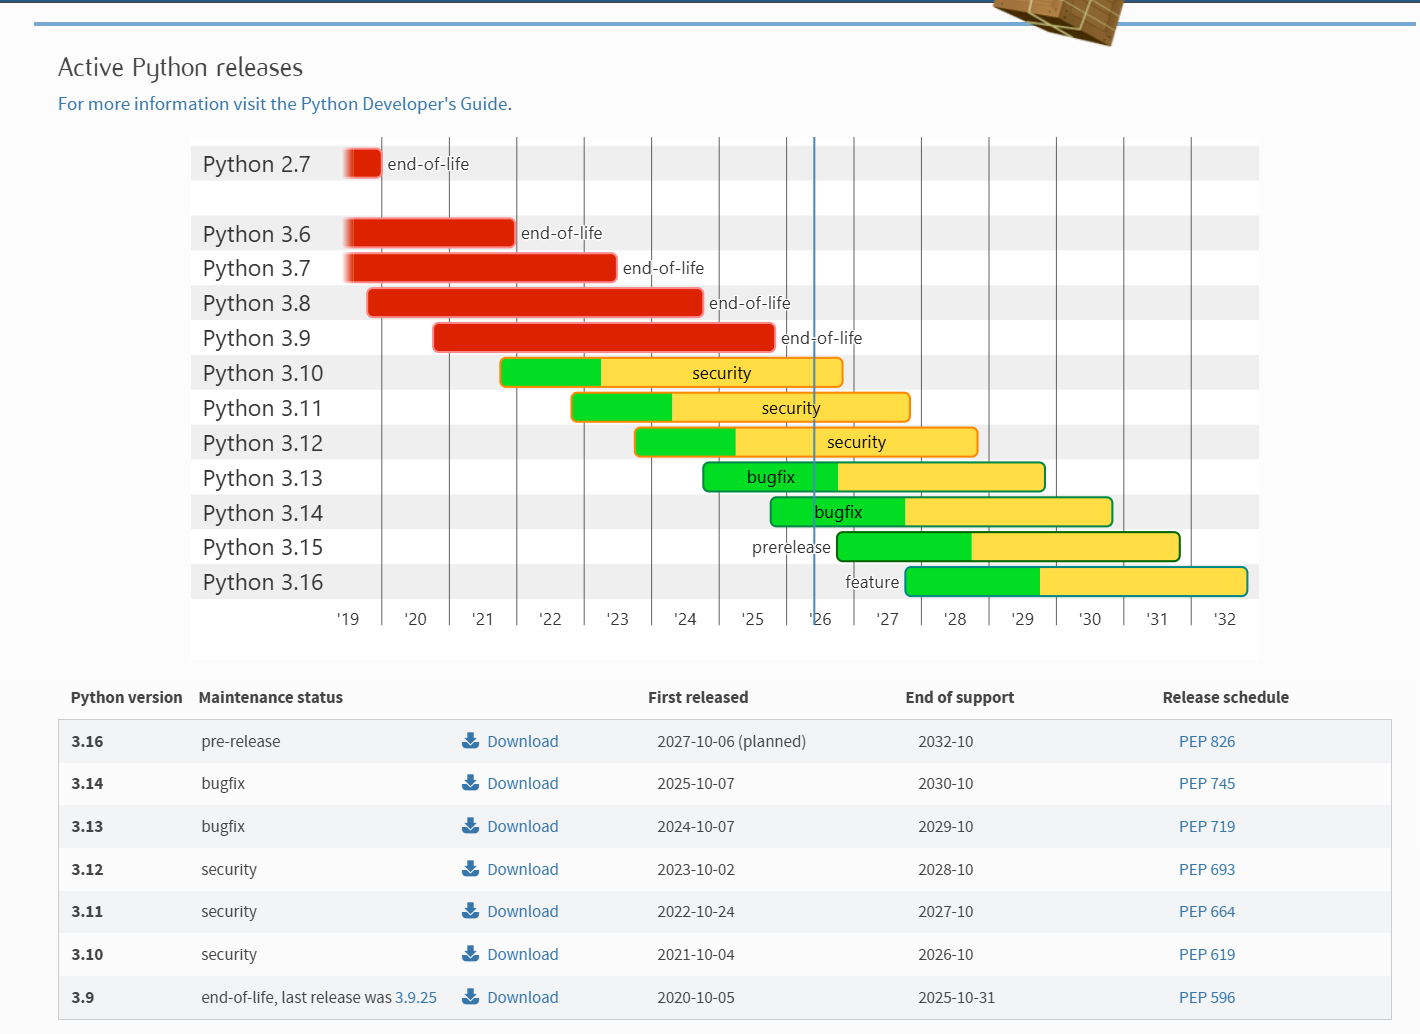
In most cases, install the latest stable version of Python.
Some projects may require a specific Python version. Different Python versions can exist on the same computer when needed.
For beginners, the latest stable version is usually the best choice. If a project tells you to use a specific version, follow that project requirement instead.
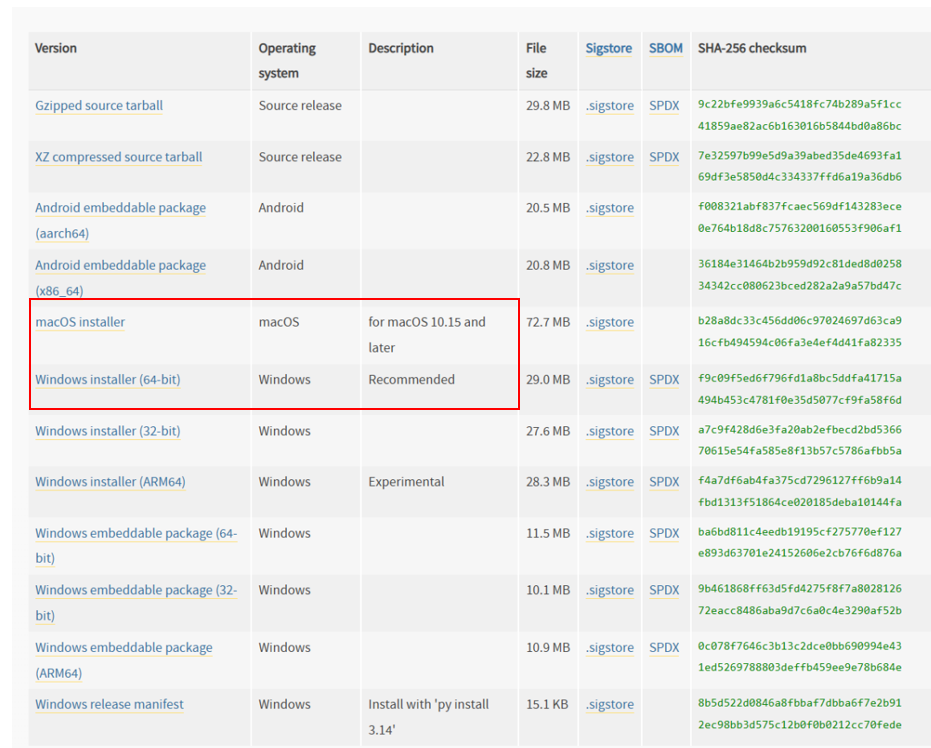
Choose the version you need and install the package that matches your operating system.
For example, Windows users should download a Windows installer, macOS users should download a macOS installer, and Linux users normally install Python through their package manager.
Windows note: Current Python documentation recommends the Python Install Manager. If the main download gives you the Install Manager, install it, open a new terminal, and run
py installto install the latest stable Python runtime. The traditional Windows installer shown in the screenshots below is also acceptable if it is offered on the download page.
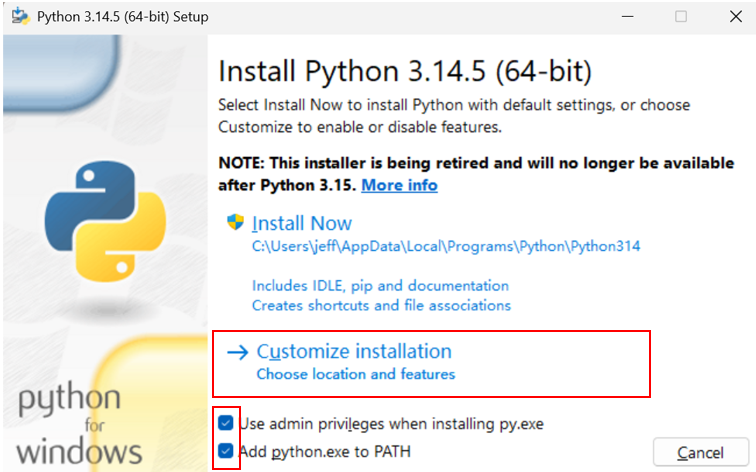
Step 3: Configure the Traditional Windows Installer, if Shown
If you are using the traditional Windows installer shown below, select Add python.exe to PATH so commands such as python can be used directly in VS Code or Terminal. If you installed with the Python Install Manager or you are using macOS or Linux, skip this step.
PATH is a system setting that tells your computer where to find command-line tools. If Python is added to PATH, you can type commands like python, py, or pip without manually opening the Python installation folder.
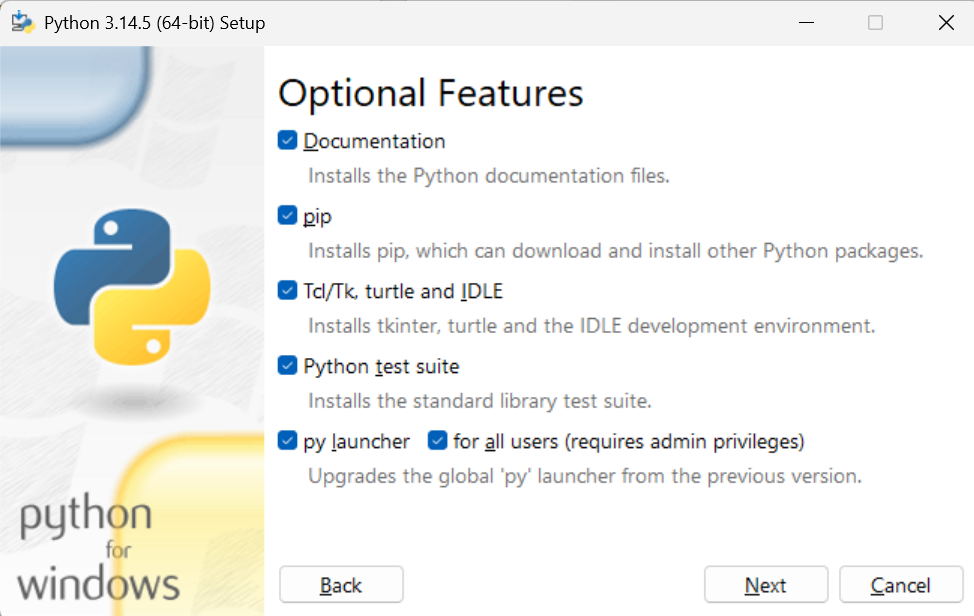
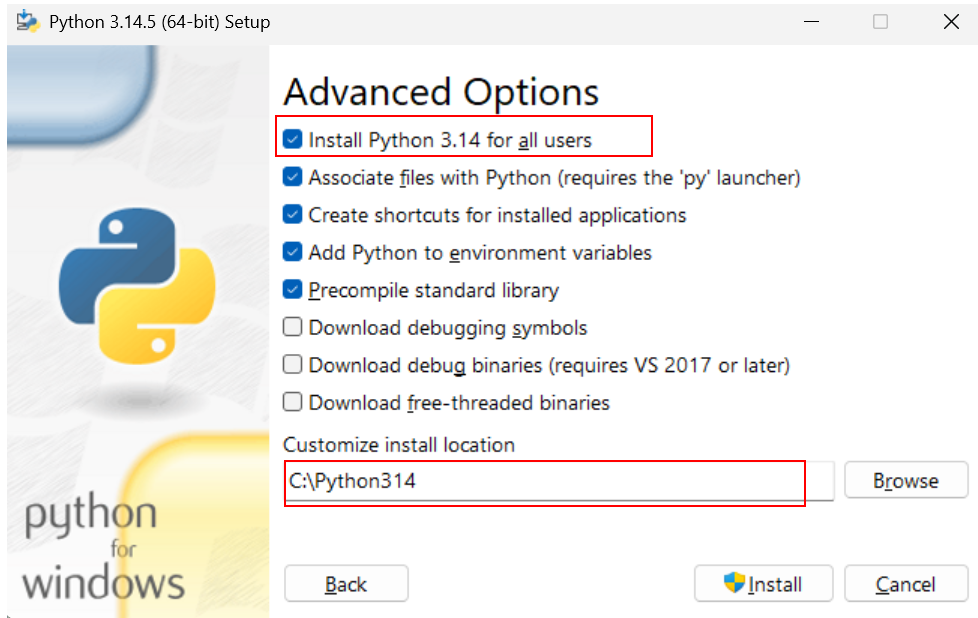
Install for all users makes Python available to other accounts on the same computer.
This option is useful if several users share the same computer. If you are the only user, either option usually works, but installing for all users may require administrator permission.
Note: Use an English-only installation path when possible. Non-English characters in the path may cause problems in some tools.
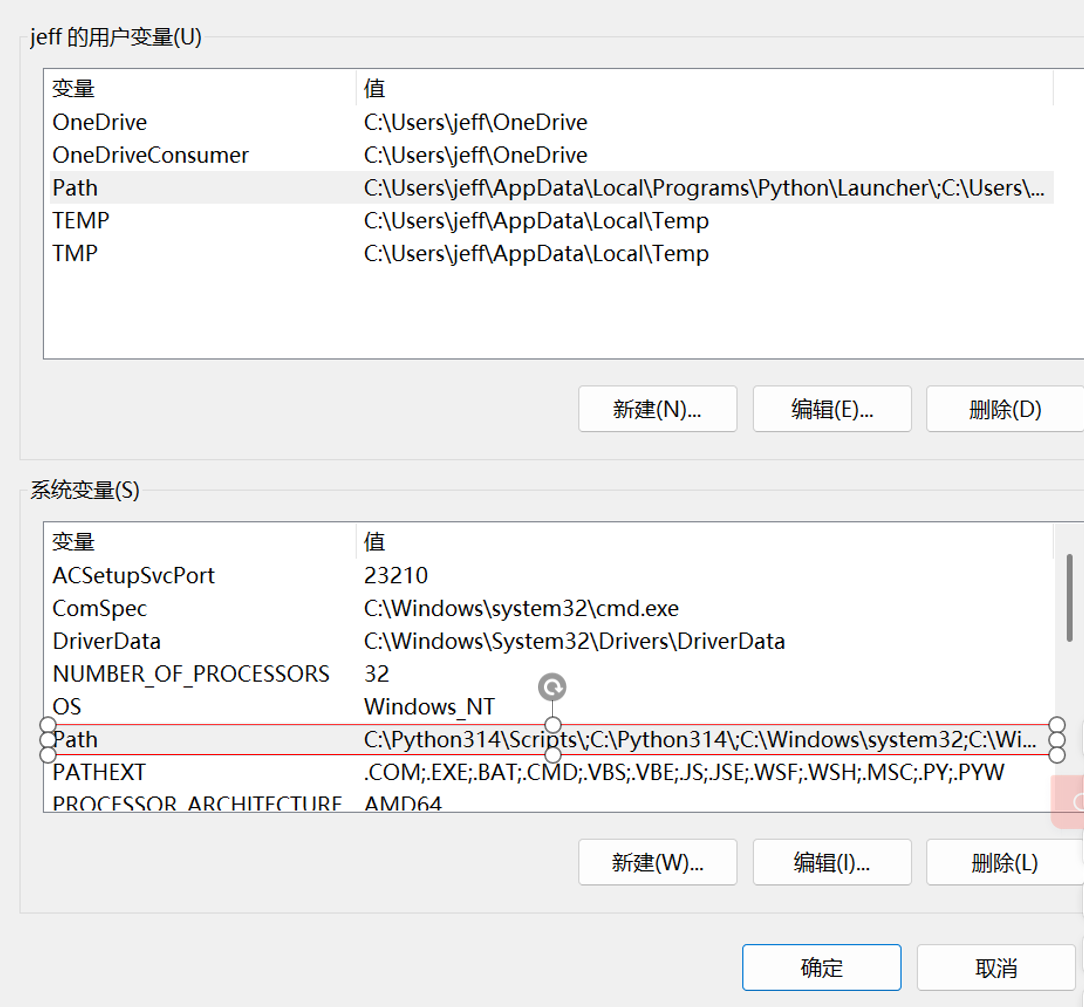
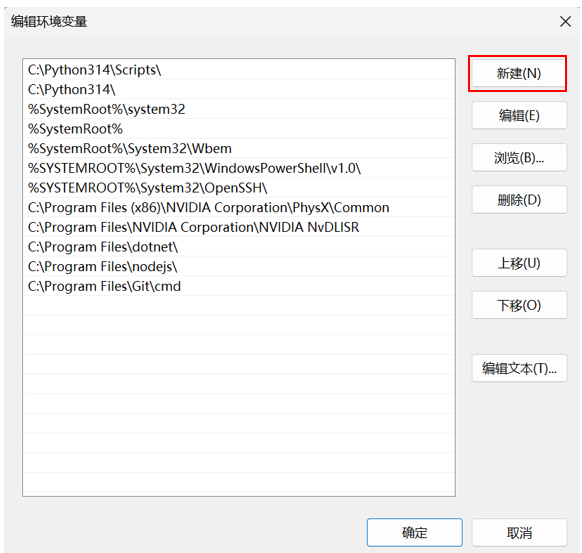
Step 4: Fix PATH on Windows if Needed
If you used the traditional Windows installer and forgot to add Python to PATH, you can add it manually.
You only need this step if commands such as python --version, py --version, or pip --version cannot be found after installation.
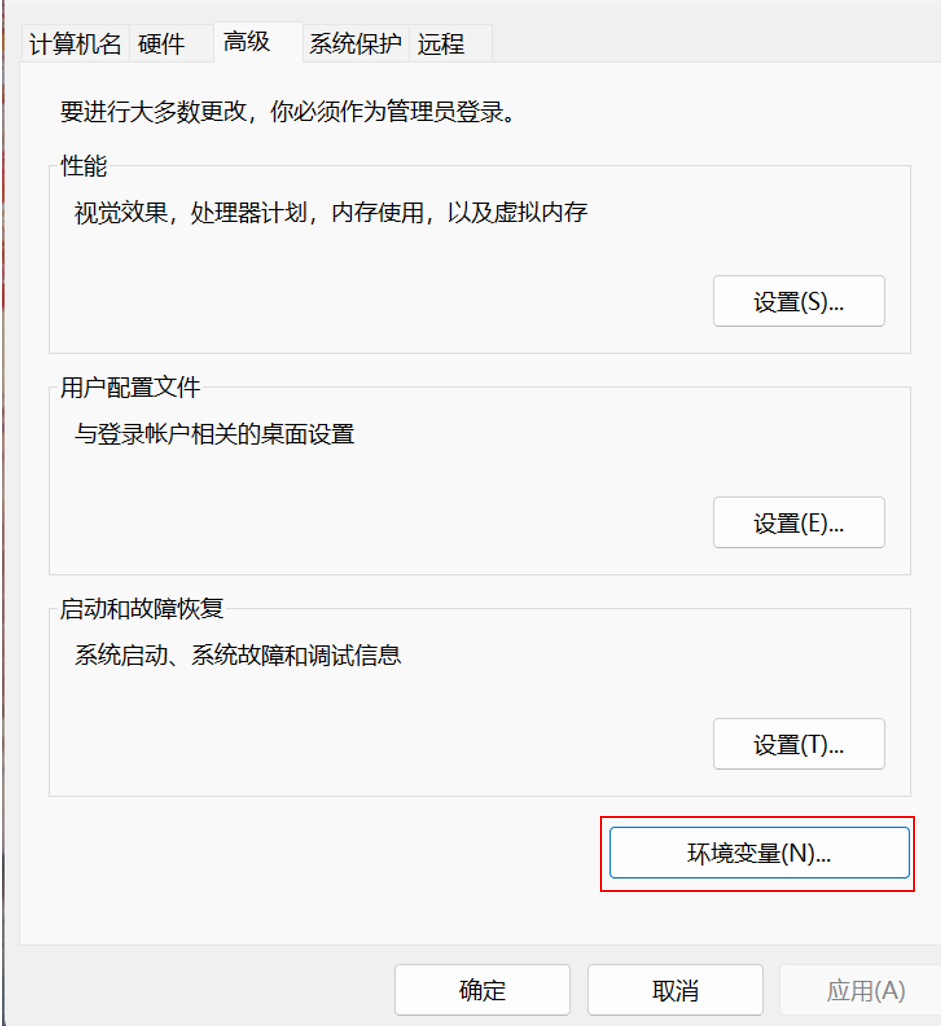
- Open Advanced System Settings on your computer.
- Find Path and open it.
- Add the Python installation location.
If you used the Python Install Manager, first open Manage app execution aliases in Windows Settings and confirm that the Python aliases are enabled. The official Windows troubleshooting page linked at the end of this guide has additional checks.
Step 5: Check the Python Installation
Use the commands for your operating system. On macOS or Linux, open Terminal or the VS Code terminal and run:
python3 --version
python3 -m pip --version
On Windows, open PowerShell, Command Prompt, or the VS Code terminal and run:
py --version
py -m pip --version
Using python3 -m pip or py -m pip makes sure that pip belongs to the same Python installation you just checked. This is more reliable than running pip by itself when several Python versions are installed.
If both commands show version numbers, Python and pip are installed correctly. If a command is not found, check whether Python was installed correctly and added to PATH.
Step 6: Run the Python Setup Check
Before Lecture 2, install the basic packages and confirm that Python can calculate, work with a table, and display a chart.
Download the Python setup check (.ipynb)
- Save the notebook to your course folder and open it in VS Code with the Microsoft Python and Jupyter extensions installed, or in JupyterLab.
- Follow Part 1 of the notebook to install NumPy, pandas, Matplotlib, and ipykernel. Select the same Python environment as the notebook kernel.
- Restart the kernel and run all cells. Confirm there are no errors, the line chart appears, and the final cell prints ALL CHECKS PASSED. Save your completed notebook.
If a step fails, use Part 2 of the notebook to troubleshoot the first error. The tests use built-in data and work offline after package installation.